The Cell processor inside Sony's PlayStation 3 is a powerhouse that lets the gaming console render highly detailed graphics at blistering speed. That same chip gives the PS3 all the processing muscle it needs to become a fully functional computer. When they(PM) first heard this was possible, they(PM) were sure the procedure had to be illegal, or that it would at least void the warranty. But as it turns out, this is that rarest of finds in consumer electronics: a perfectly legal, manufacturer-supported hack that adds significant functionality. With a little bit of effort and expense, they(PM) turned a PS3 into a Linux computer—without losing any of the machine's native gaming goodness.
Step 1: Back Up

Sony hardly walks people through the conversion process—you've got to know where to look in the PS3's menus, and many of the steps can be a bit tricky. But the first procedure is a no-brainer—back up your data. That's a good idea before doing major tinkering with any PC, and it's especially smart with this project, which requires the installation of a second operating system and either reformatting or replacing the PS3's hard drive. The PlayStation's own OS won't disappear in the process (it's stored on flash memory), but saved games will be wiped clean, so it's critical to back them up. A backup command that works with any USB-connected external drive is built into the PS3 OS (it's under "System Settings"), but it will only back up saved game data. Other media files (music, video, etc.) need to be backed up manually.
Step 2: Upgrade Your Drive

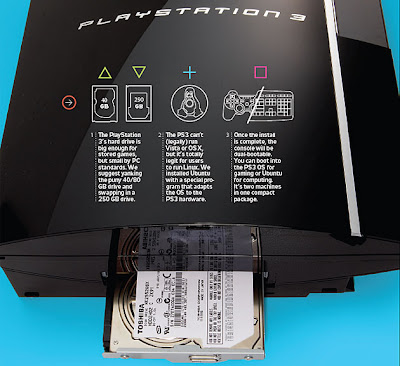
PlayStation 3 ships with either a 40 or 80 GB drive. That's plenty of storage for games and could suffice for basic computing. But upgrading the hard drive on the PS3 is remarkably easy, so we saw it as a good excuse to bump up the storage capacity to a more PC-friendly level. The PS3 uses 2.5-in. laptop drives, and highcapacity replacements can be purchased from online retailers such as Newegg or Directron for $60 to $150. We went for Toshiba's capacious 250 GB—ample space for large movie, music and photo collections.
The drive is located behind a small removable panel on the side of the PS3 and can be replaced without too much muss and fuss. It is secured in a removable cage, which is held in place by one screw. The upgrade is similar to a drive replacement in a PC—old drive pops out, new drive pops in. When the console is turned on, the PS3 formats the new drive.
Step 3: Install Your New OS

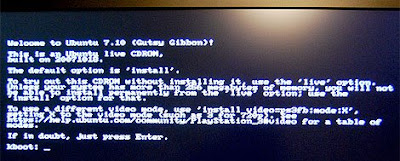
This is where things get somewhat complicated. PS3 can't run Microsoft Windows or Apple's OS X but it can run Linux operating systems. There are many Linux varieties, but our favorite is Ubuntu. And it turns out that the open-source community has created a program called kboot that helps load Ubuntu onto the PS3.
To download an installation kit including both kboot and the Ubuntu OS, click right here. The file is an ISO, which can be burned to a CD or DVD to create a bootable disc with a program such as ImgBurn.
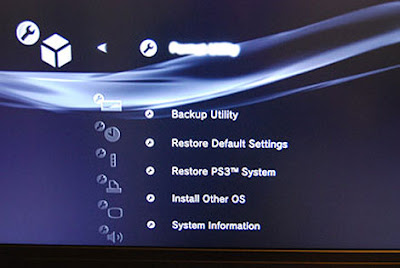
The first step in loading the new operating system is to create a drive partition. Select "System Settings," then "Format Utility" from the menu of the PS3. Choose "Custom" and allot 10 GB to the "Other OS." Choose "Quick Format," then restart.
Once the partition is made, the OS can be loaded from the Ubuntu disc using the "Install Other OS" function under "Settings" in the PS3 menu. This installs kboot, which allows the PS3 to install Ubuntu.
Switching between the PlayStation operating system and Ubuntu is not as straightforward as dual booting a standard PC. In fact, after installing the kboot file, you need to delve back into the PS3's System Menu to designate "Other OS" under "Default System" before the PS3 even installs the full Ubuntu OS. When you restart the PS3, plug a mouse and keyboard into the USB ports. (PlayStation controllers are good for gaming, but terrible for computing.) The console will boot using your Ubuntu disc and install the new system. (Expect it to take about an hour.)
With Ubuntu installed, you can use your PS3 to run programs such as OpenOffice for spreadsheets and word processing, Firefox for Web surfing and VLC for movie playback. In short, your console will be able to do anything a normal PC can do.
There is, however, a trick to getting back to the native PlayStation OS. To make the switch, reboot the console, and at the boot prompt, type "boot-os-game," then press Enter. This brings the PS3 back to game land.
